
For his eighth birthday, my son desired a helicopter cake. I trembled in my boots at this, I did. I looked online and was more intimidated, what with the cake propellers that really move and all. However, I was going to do it because this is the main way I show my love for my children. That, and teaching them stuff. Changing diapers. Doing laundry. Making dinner. Cleaning scrapes. Etcetera.
Ahem.
When I announced I was going to use the doll’s dress cake pan, my son was horrified. “I do not want a princess birthday cake!” I had to convince him that shapes can have more than one purpose.
So, let me teach you how someone who is not a perfectionist makes a helicopter cake.
For starters, we drew quite a large crowd this year {Memorial Day weekend is always unpredictable–will our family be in town or out of town? we never know}–a little over 30 people. So I used three boxed cake mixes {which I got on sale for 70 cents apiece, thankyouverymuch}: two yellow and one white. I mixed them all in one big mixing bowl, because that’s the efficent way to do it. Then, I filled the doll dress pan as high as I thought was safe, and dumped everything else in a 9″x13″ pan.
Bake forever…it takes a while with that much cake batter.
Cool completely. Then, pop those cakes out, wrap them in plastic wrap, and freeze them. You can even keep them in the freezer for a couple days if you need to. Frozen cakes are much easier to frost.
When you’re ready for decorating, make sure you have your favorite Wilton gel coloring. I used a bright red, a bright blue, and black. The black ended up being a bit shiny, which was nice since I used it for the windows. The bulk of the helicopter was white though. If in doubt, make your cake white. This will save you time and money!
Step One
 |
| stacked cakes |
Stack those cakes. Put the doll dress {henceforth referred to as the “dome cake”} on the rectangle, as far forward and to one side as possible. Cut two straight lines into the rectangle away from the dome to form the tail section. Next, cut a circle around the rest of the base of the dome. You will likely be able to pull off a thick piece from the side nearest you, a smaller piece from the other side, and then a very skimpy corner piece.
Save these pieces!
Cut a small square or rectangle or two to make the raised portion of the tail section. Also, take that narrow corner piece you cut off, and move it to the front to provide a “nose” for the helicopter.
Now, you have your basic shape!
Step Two
 |
| cut and pieced together |
Frost everything white. Think of this as your “base coat.” I like to use the Wilton Cake Icer Decorating Tip to make it fast and easy. However, comma, this odd shape takes time and patience no matter what you’re using. Oh! Almost forgot! I pulled the cut pieces away from the main shape, added some frosting “glue” and then pushed them back together. This makes the cake more sturdy. I didn’t completely glue the dome onto the top of the cake, but I did fill any gaps in between the base and dome with frosting.
Step Three
 |
| basic windows |
Make some black frosting. The best way to do this is to first make chocolate frosting by adding cocoa powder {and water, as needed to maintain spreading consistency} to your white frosting. Once you have brown frosting, you can make black using the Wilton black gel without having to use an inordinate amount. Now, make your windows. I used a small circular tip {sorry, I don’t remember the numbers} to pipe on outline, and then a basket weave tip to fill it in. Once it’s filled in like so, it’s easy to use a spatula to spread it the way you like it.
Si’s sister taught me to heat the spatula with hot water {and then dry it with a clean towel, of course} to get a smooth spread. It sort of melts the frosting.
Step Four
 |
| with stripes and more |
Make your red and blue frosting, if you haven’t already, and pipe some stripes along the bottom. I accidently made my frosting a bit too runny, and had a hard time controlling it. Here is how to practice being Type B: Say to yourself how you wish the stripes were straighter. Sigh to yourself, even. Then, move on. Do not, I repeat, do not, remove the stripes and/or try to fix your mistake. You are not a professional cake decorater, and if you start to do this, all fun will be sucked out of your project!
Next, put a fat round tip on your blue, and pipe on the stair thingie that hangs off the side of a helicopter. What in the world is that thing called? I also opted to add a giant number 8 on the back. If your child isn’t turning 8, I would suggest using the appropriate number.
Step Five
 |
| tail view |
 |
| front propellers |
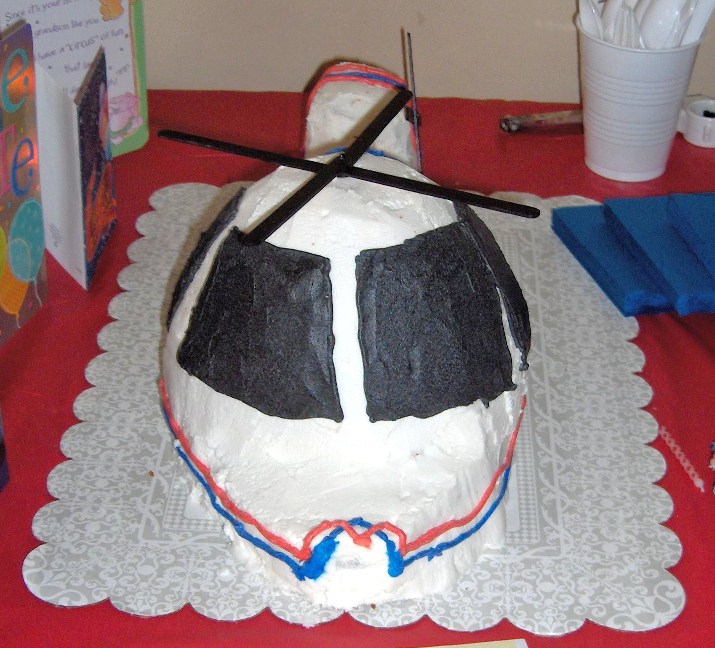
These propellers are easy! My son used a Sharpie to color six popsicle sticks completely black. Then, my husband pinned {with a normal pin like one would use in sewing} two together in the middle for the smaller propeller and four together at the ends for the larger one. The pin stuck into the cake, helping them to stay on, but pressing them into the frosting a bit is also important.
Step Six
 |
| closeup of smashed nose |
 |
| smashed front |
Store overnight in refrigerator, and regret it later. Why? Thank you for asking. This is why: When you had a bad feeling about that final shove to “make it fit” you were probably right. Good thing this tutorial is for non-perfectionists.
Now is probably the time to give you another of Si’s sister’s helpful lessons: save your frosting. In fact, if you have it in those little bags with the tips on, even better. Just put them in a plastic container with a lid and pop them in the fridge. This is a just-in-case measure that will pay off when you least expect it!
 |
| closeup: tail fracture |
 |
| fractured tail section |
Sometimes, you don’t just have a little smash in the front. Sometimes, the tail section fractures. And you may never know why this happens, because it doesn’t appear to have a knowable cause.
Don’t cry. Don’t have a bad attitude like I did. We can fix it.
Step Seven
 |
| “8” saves the day |
So, it’s the morning of your party, and you find yourself glad that you kept all of that frosting ready to go! If you are in a hurry, sit the frosting outside in the sun for 15 minutes, and that’ll get it the right consistency. Beware of microwaving! Remember that those tips are metal, the plastic icing bag is likely not microwave safe, and microwaves tend to make frosting runny rather than smooth.
 |
| finished helicopter cake |
I decided the easiest way to fix the smashed nose was to simply pipe an 8 over the area where the frosting was worst, and forget about the rest of the problem.
As far as the tail fracture is concerned, here is my rule of thumb: if in doubt, use stripes. Stripes {and also dots and leaves, flowers and stars} cover a multitude of decorating sins. In this instance, I chose one thick blue stripe with a single thin red stripe on either side.
Step Eight
It seems appropriate that there should be eight steps for this eighth birthday cake. This step, however, is a little unconventional. Let’s say you’ve served the cake to your guests. Everyone is lounging around. This is when you’re tempted to let down your guard and relax.
Just know that there is a toddler somewhere waiting for this very minute. He knows where the spoons are, and he knows how to use them:
So step eight is simple: Keep an eye on that cake!
For the record, this little guy said “Mmmmm!” after every bite…and he had quite a few, as we had to locate the camera before anyone was allowed to scold him!

15 Comments